
Locating a septic tank you already know exists is fundamentally different from discovering one for the first time. You have already confirmed the system is present on the property, you likely have some idea of the general area from records or anecdotal information from previous owners, and your goal is precision. This guide focuses on the techniques that deliver accurate tank pinpointing rather than broad area searching, including soil-specific approaches, electronic locating equipment, camera scope methods, and the critical step of permanent marking once the tank is found. Understanding how professionals approach this task helps you either execute the work yourself with higher confidence or communicate more effectively with a service company you hire.
What You Should Know Before Searching
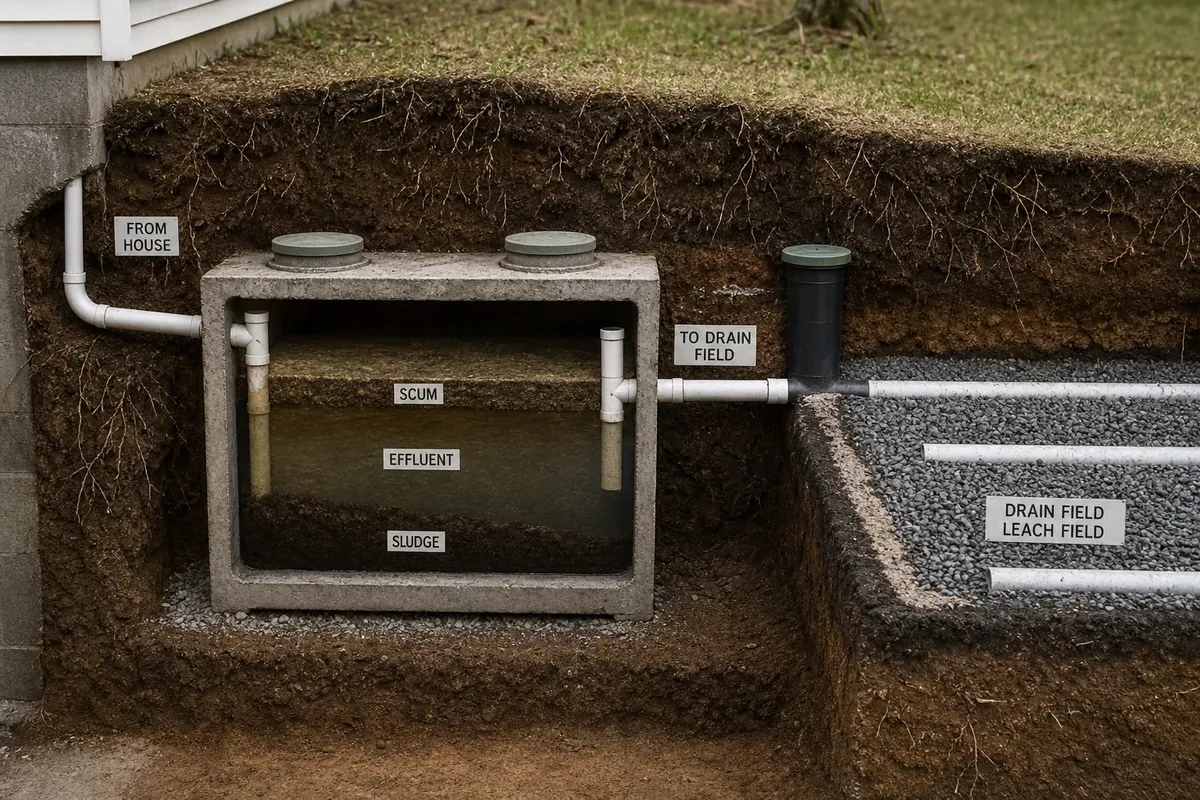
Before beginning any search, gather whatever information already exists about your system. If you have the as-built diagram from your local health department, this is your starting map. Even a vague diagram showing which side of the house receives the main sewer line narrows your search considerably compared to searching an entire property. The inlet pipe from your house enters one end of the tank, and the outlet pipe exits the opposite end toward the drain field, so establishing that directional flow tells you the tank orientation before you find it. For a complete overview of how the tank fits within the overall system, review our septic tank components guide.
Many homeowners assume all tanks sit at the same depth, but installation depth varies based on local frost lines, slope requirements, and the original installation era. Older tanks in northern climates were often installed shallower than modern code requires, while tanks in warm climates may sit deeper to maintain consistent temperature. Knowing approximately how deep your tank might be helps you calibrate detection expectations. Most tanks fall within 12 to 30 inches of the surface, but anything outside that range is possible depending on your property conditions.
Confirm the location of underground utilities by calling 811 at least two business days before you begin any probing or excavation work, even if you plan only shallow probing. The 811 service marks electrical, gas, water, and communications utilities but generally does not mark private septic components. Respect the utility marks and maintain a reasonable buffer distance from them when using detection tools. This step is non-negotiable for safety and for avoiding costly damage to utility infrastructure.
Soil Type and Detection Method Selection
Different soil types affect detection tool performance significantly, and matching your method to your soil produces faster, more reliable results. Sandy and loose loamy soils transmit metal detector signals clearly but generate more ground noise from natural minerals and buried debris, requiring more careful signal interpretation. In these conditions, sweep the detector slowly in overlapping passes and learn to distinguish the broad response of a tank lid from the sharp response of a small metal object. Mark all signals that persist across multiple passes before concluding any are the tank.
Clay-heavy and dense soils resist soil probe insertion but often produce the most obvious visual surface clues because they compact firmly above the tank and create distinct depressed areas that remain visible year-round. In these soils, combine visual observation with probe verification. Insert the probe at shallow intervals and note where resistance changes, because the clay transmits pressure changes effectively and you will feel a definite difference when the probe tip reaches the tank lid versus passing through soil alone. Rocky soils present a different challenge because stones deflect probes and create false resistance signals. In properties with rocky substrate, rely more heavily on electronic detection and camera scope methods rather than probing.
Red clay soils common in southern and southeastern regions are particularly challenging for metal detectors because the high iron content creates substantial ground interference. In these areas, professionals often use frequency-shift or multi-frequency detectors that filter out the iron mineral interference. If you have a basic single-frequency detector and your property has red clay soil, consider renting a more capable unit rather than struggling with inconsistent signals. Our septic installation guide covers soil evaluation requirements that affect system design, which provides additional context about why soil type matters for detection.
Electronic Tank Locators and Metal Detectors
Dedicated septic tank locators are electronic devices that transmit a signal through the soil and detect anomalies caused by buried structures. Unlike general-purpose metal detectors, these units are designed specifically for underground tank detection and typically offer adjustable depth penetration and signal strength controls. The transmitter is connected to a probe inserted into the soil, and the receiver picks up the signal reflection pattern that indicates a hollow structure below. These units can detect plastic tanks as readily as concrete tanks because they respond to the physical void rather than metal content.
Standard metal detectors remain effective for tanks with metal components, particularly rebar-reinforced concrete tanks and any tank with metal riser lids. Sweep the detector in a grid pattern starting from the probable tank area based on your records. When you receive a signal, do not assume the strongest signal is the tank. Investigate the full response pattern by sweeping in perpendicular directions to understand the shape of the buried object. A tank lid produces a broad rectangular or oval signal, while a metal pipe or underground utility produces a narrower linear signal.
Risers with metal covers are the easiest septic components to detect with any metal detector. If your system has risers extending toward the surface, the metal lid sits close enough to produce a strong clear signal that stands out from background noise. After locating the riser, you can measure from that known point to locate the tank body itself. Many properties have a single riser at the outlet end of the tank where the drain field connection is made, while the inlet end where the sewer pipe enters may not have a riser at all.
Ground-penetrating radar represents the most advanced option for difficult detection scenarios. GPR equipment sends radar pulses into the ground and analyzes the return signals to identify buried interfaces and voids. The equipment is expensive for homeowner purchase but can be rented from specialty equipment suppliers in some areas. GPR is particularly useful when you know the tank is in a specific area but cannot get confirmation from other methods, such as properties with extremely challenging soil conditions or tanks installed deeper than standard detection depth. If you need professional-grade detection, a septic service technician brings GPR equipment as part of their standard locating toolkit.
Using a Septic Camera Scope
A septic camera scope provides a direct visual method for confirming tank location by traveling through the sewer pipe from your house to the tank. The camera is mounted on a flexible cable that spool from a reel unit, and the operator feeds it into the building sewer cleanout while watching the video feed on a portable monitor. When the camera reaches the tank inlet, the image changes from pipe interior to the open chamber of the tank, and the on-screen distance counter tells you exactly how far the tank is from the cleanout point.
Rental septic camera scopes are available from some equipment rental centers and septic service suppliers. The rental typically includes the reel unit, camera head, and monitor display, and most units are designed for straightforward operation by non-professionals with brief instruction. Before renting, confirm the camera head size will fit your building sewer pipe, which is usually 4 inches in diameter for residential systems. Feed the camera slowly and steadily to avoid kinking the cable or getting it stuck at a fitting or bend in the pipe.
The camera scope method works regardless of soil type, tank material, or installation depth, making it the most universally applicable locating technique. The primary limitation is that the camera must be able to travel the full distance from the cleanout to the tank without obstruction. If the sewer line has roots, accumulated debris, or collapsed sections, the camera may not reach the tank and you will need to clear the line first or use a different method. For more on sewer line maintenance and what affects camera travel, see our septic inspection guide.
One important advantage of the camera method is that it also inspects the pipe condition during the locating process. As the camera travels through the sewer line, you see any cracks, root intrusion, sags, or other problems in the pipe itself. This additional information is valuable for system maintenance planning and may reveal issues that would otherwise go unnoticed until a backup occurs. Document any pipe problems you observe by recording the on-screen distance counter at each problem location.
Soil Probe Technique in Detail
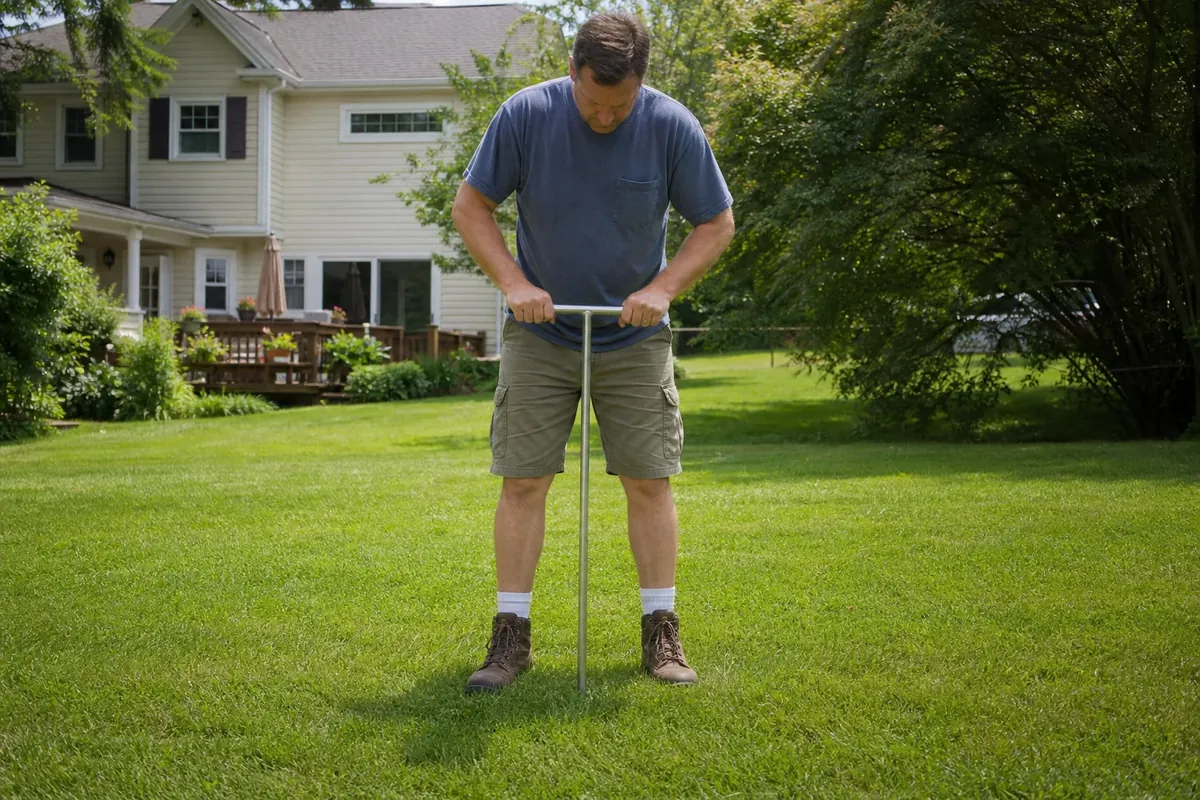
The soil probe method detects the tank lid by sensing the difference in resistance between soil and a solid buried surface. When the probe tip reaches the lid, you feel resistance spike suddenly compared to the give of soil alone. This method works best with concrete tank lids that sit at consistent depth, and it is most effective in loamy or sandy soils where resistance changes are easy to feel through the probe shaft. In rocky or clay-heavy soils, the natural resistance makes the signal harder to interpret, and the probe itself may be deflected by stones.
Use a probing rod that is at least 36 inches long to accommodate tanks installed at typical depth. Insert the probe vertically with slow steady downward pressure, pausing every 2 to 3 inches to feel the resistance through the shaft. When you encounter solid resistance before reaching 18 to 24 inches, stop and mark that spot. Do not force the probe downward because applying heavy pressure against a solid lid can create chips or hairline cracks in concrete, and it also risks bending the probe tip if it catches on a protruding edge. After marking the first contact point, probe surrounding spots in a grid pattern to outline the tank dimensions.
Mark every contact point with a flag or stake so you can step back and see the full pattern you have mapped. The shape you reveal should correspond to a rectangle or oval consistent with standard tank dimensions. If you find a contact point but the surrounding probes do not reveal a coherent shape, you may have contacted a pipe, a buried rock, or a root cluster rather than the tank. These false positives are common and expected, which is why the grid pattern approach matters. The more points you probe, the clearer the actual tank shape becomes.
If the soil is too hard from recent drought or compaction to probe effectively, wait for rain and softer soil conditions before attempting this method. Probing into extremely dry and hard soil is difficult and potentially misleading because resistance increases across the entire area regardless of what lies below. Watering the search area thoroughly the day before planned probing can help, but avoid saturating to the point of creating muddy conditions that make marking difficult. The optimal moisture level is damp but not saturated, where the soil holds together but does not cling to the probe.
Professional Locating Services
Professional septic service companies bring specialized locating equipment and experienced operators who have located hundreds of tanks in varied conditions. When you call to schedule a locate service, describe what you already know about your system including any records you have found, the age of the system if known, and any previous unsuccessful attempts you have made. This information helps the technician prepare the right equipment and approach for your specific property.
The typical professional locate visit includes electronic tank detection, depth measurement, and exposure of the tank lid if you request it. The technician uses a tank locator transmitter to send a signal through the soil and a receiver to detect the tank position and depth. Most technicians can complete the locate in 15 to 30 minutes on a property with relatively accessible conditions. If they expose the lid, they can visually confirm the tank dimensions and structural condition while they are there, providing a bonus inspection element.
Professional location is strongly recommended when you are preparing for construction or major landscaping work near the probable tank area, when the property has extensive underground utilities or irrigation systems that make probing risky, when you need the location documented for a real estate transaction or home inspection report, or when you have spent more than an hour searching without success. The cost of professional location is typically modest compared to the potential cost of damaging the tank or excavating in the wrong location.
Ask the service company whether their locate service includes documentation you can keep, such as a written record of the tank position, depth measurements, and diagram sketch. Some companies provide a follow-up email with photos and notes. This documentation is valuable for future reference and for passing along to new homeowners if you sell the property. For a broader view of what professional septic services include, see our maintenance overview.
Permanent Marking After Location
Finding the tank once is useless if you have to relocate it again every time you need service. Permanent marking ensures the tank location remains visible and clear for years, even if the yard changes over time with new landscaping, grading adjustments, or seasonal vegetation changes. The marking method must be durable enough to survive weather and lawn maintenance but should not create a hazard or interfere with future excavation when the tank needs service.
Concrete-safe landscape paint applied to a fixed object near the tank is one of the most durable marking options. Choose a location on a permanent structure such as a fence post, building foundation wall, or fixed hardscape element where the paint will not be disturbed by mowing or foot traffic. Apply a small circle or crosshair pattern and write the word SEPTIC nearby with an arrow pointing toward the tank direction. This visible marker is easy to find in an emergency and does not require any digging to reinstall if the painted surface is ever repainted or replaced.
Alternatively, bury a marking stake or flag at the tank lid location itself, positioned so it does not interfere with the lid or any future access excavation. Use a plastic or metal stake that will not corrode quickly, and mark it with a bright color that is visible above the soil surface. Some homeowners use a short piece of PVC pipe driven into the ground at the tank center with a cap that sits just below the surface, allowing the lid to be found quickly by probing down to the cap.
Record GPS coordinates of the tank location in your phone and in written home records. Take photos of the tank area from multiple angles showing the house, nearby landmarks, and the tank lid once it is exposed. These records survive any physical marking that might be disturbed or covered over time and provide redundancy in case multiple location methods are needed in the future. Many homeowners have found this documentation invaluable when they move to a new property or when family members need to coordinate maintenance during an emergency.
Creating a Septic Tank Map
A hand-drawn map of your septic system is one of the most practical documents you can create for your property records. This map serves as a reference that outlasts any physical marking and transfers directly to future homeowners or service technicians without requiring them to search for or interpret other records. The map should show the house outline from a top-down view, the tank position relative to the house and property boundaries, the inlet pipe direction and distance from the house foundation, the outlet pipe direction toward the drain field, and the drain field line layout.
Use a measuring tape to get accurate distances from fixed reference points. Measure from the house foundation to the tank center in two perpendicular directions, such as 14 feet from the back foundation wall and 8 feet from the side property line. These coordinates let anyone recreate the tank location on paper even without access to the physical site. Measure the overall tank dimensions as well, including length and width or diameter if accessible. Measure the distance from the tank to the drain field header pipe or first line.
Include compass direction on your map so the orientation is clear, and note any structures, trees, or underground obstacles that lie between the house and the tank or between the tank and the drain field. If you know the tank depth from professional measurement or exposure, include that as well. Store the map with your other important home documents such as the as-built diagram from the health department, appliance warranties, and home insurance papers. A copy in your email or cloud storage provides additional redundancy.
The author of this guide has seen many situations where a simple sketch would have saved hours of searching and hundreds of dollars in service call charges for tank location. Any map you create now is an investment in smoother maintenance visits for the entire time you own the property. For additional context about the drain field portion of your system that connects to the tank, see our drain field guide.
Seasonal Considerations
The time of year and current weather conditions affect which detection methods work best on your property. Spring and fall typically offer the most favorable combination of moderate soil moisture and accessible conditions for the widest range of detection methods. The soil is neither saturated and muddy from spring rains nor hard and dry from summer drought, making probing effective and metal detector signals clear. Temperate weather also makes the outdoor work more comfortable for extended searches.
Summer drought conditions make soil probing extremely difficult because the ground becomes hard and resistant across the entire search area, eliminating the differential resistance that makes the probe method useful. Metal detectors perform better in dry conditions because soil conductivity decreases and the tank metal signals are clearer relative to ground noise. If you need to locate during summer, early morning when dew has slightly softened the surface may offer marginal improvement, or water the search area the day before.
Winter conditions vary significantly by climate. In regions with frozen ground, probing is impossible and metal detector performance is degraded by frozen soil mineral content. However, snowmelt patterns provide a natural visual indicator in winter because the ground above the buried tank thaws faster and melts snow more quickly than surrounding areas. This effect is most pronounced after fresh snowfall and can reveal the tank location with minimal effort if you know what to look for. Spring often reveals tank locations through standing water patterns as snow melts and rain accumulates in the subtle depression above the tank.
Heavy rainfall creates both advantages and challenges. The soil becomes more conductive for electronic detection, improving metal detector performance, but also creates more background signals from moisture variation across the property. Surface clues become more pronounced after rain because depressions hold water and vegetation differences stand out more clearly. However, very saturated soil may make probing impractical and can obscure small depressions as water spreads across the surface rather than pooling in the tank depression specifically.
Documentation for Future Reference
Once you have located and marked the tank, complete documentation ensures the information survives changes to your property, your memory, and your ownership. The documentation package should include the hand-drawn map described above, photographs of the exposed tank and any visible markings, GPS coordinates from your phone or GPS device, the depth measurement if obtained from a professional service, copies of any health department records you requested, and notes about any relevant observations such as the direction of inlet and outlet pipes or the presence of risers.
Store this documentation in at least two locations: a physical folder with your other important home documents, and a digital copy in cloud storage or email. Label any digital files clearly with the address and date so they are easy to find years later. If you use a home management app or paper planner, add the septic tank location as a recurring reference entry alongside other important home maintenance information like HVAC filter change schedules and water heater age.
Sharing the tank location with household members and any contractors you hire prevents the situation where one person knows the location but cannot communicate it when needed. Tell anyone who might need to find the tank where it is marked, and point out the location physically rather than relying on verbal description alone. For contractors performing work anywhere near the tank area, show them the map and walk the property line to ensure they understand the exclusion zone they should maintain around the tank and drain field.
Consider documenting the drain field location as well, since that is another component you will want to protect from heavy traffic and construction. The drain field occupies a larger footprint than the tank and is often harder to detect visually, so knowing its approximate position from your system records and mapping it alongside the tank is valuable. For more information about maintaining the entire system once you have located all components, browse our blog posts on septic maintenance.
Related Articles
How to Find Your Septic Tank: Complete Location Guide
From reading property records to using a soil probe, this guide covers every method for locating your septic tank.
How Deep Are Septic Tanks Buried: What Lies Beneath Your Yard
Septic tanks are typically buried 6 inches to 4 feet underground depending on frost lines, soil type, and local code.
How Does a Septic Tank Work: The Complete Breakdown
A septic tank uses gravity and bacteria to separate solids, treat wastewater, and distribute effluent to your drain field.
External Resources
Frequently Asked Questions
What is the most accurate method for locating a septic tank I already know exists?
The most accurate method combines electronic tank locators with ground-penetrating radar. Professional septic service companies use this equipment to pinpoint the tank position and measure its depth without excavation. This approach is particularly valuable when visual clues are ambiguous or when the tank has minimal metal components that would otherwise make detection difficult.
How do soil type differences affect septic tank location methods?
Sandy and loose soils transmit metal detector signals more effectively, making electronic detection easier but also producing more background noise. Clay-dense soils resist probe insertion but often show clearer visual surface clues like depression and vegetation changes. Rocky soils may deflect probes and require camera scope methods. Understanding your soil type helps you choose the right primary and secondary detection methods for the most efficient search.
What should I do immediately after locating my septic tank?
Mark the location permanently using concrete-safe paint on a fixed object near the tank, record GPS coordinates in your phone and home records, sketch a dimensions-accurate diagram showing distance from the house foundation and other landmarks, and photograph the lid area from multiple angles. This documentation saves you from having to relocate the tank during future service visits or emergency situations.
Can a septic camera scope help locate a tank when other methods fail?
Yes. A septic camera scope inserted into the building sewer cleanout can travel through the pipe until it reaches the tank inlet, at which point the camera operator sees the tank interior and can confirm the location. Many rental septic camera units display depth measurements that tell you exactly how far the tank is from the cleanout point. This method is especially useful for very large properties where other detection methods would require extensive searching.
How do seasonal conditions affect septic tank location accuracy?
Wet seasons make soil more conductive for metal detectors and cause tank areas to appear as subtle depressions or brighter grass patches due to elevated moisture and nutrient levels. Dry seasons compact soil making probes more difficult but often produce more visible grass color differences above the tank. Winter frozen ground makes probing impossible but snowmelt patterns can reveal tank location. The optimal search time depends on your primary detection method and local climate.
When should I hire a professional tank locating service instead of doing it myself?
Hire a professional when you have searched for more than an hour without success, when you need the location confirmed for a construction project or real estate transaction, when the property has complex underground utilities that make probing risky, or when you need the tank depth measured for planning drainage or landscaping work. Professional locators typically include location confirmation and basic inspection in their service fee.
Written by Mike Henderson
Mike Henderson is a certified septic system inspector with over 18 years of hands-on experience in wastewater management across Florida and the southeastern United States. He holds certifications from the National Association of Wastewater Technicians and regularly consults homeowners on preventing costly septic failures. His work has been referenced by regional health departments and home inspection agencies.